Rental Property Overview
From Standout Property Manager Wiki Help
Creating a rental property
Rental Modes
Standout works with three modes of Rental properties classed as Managed:
| Managed? | |
|---|---|
| No | In this mode all you are responsible for is to find a tenant for a Landlords property, normally just a fee will be raised for this service. |
| Rent Collection | In this mode you will collect rent from tenants and pass the payment minus your fees to the Landlord and are not responsible for anything regarding the property. |
| Yes | In this mode you will arrange everything concerning the property, repairs, certificates, rent. |
Rental Tab
Rental options
Shared property
Standout can cater for a Shared Property (HMO) and can be configured by part of the system. For an in-depth overview, please see our document “Rental Property HMO Overview”.
Property finance information
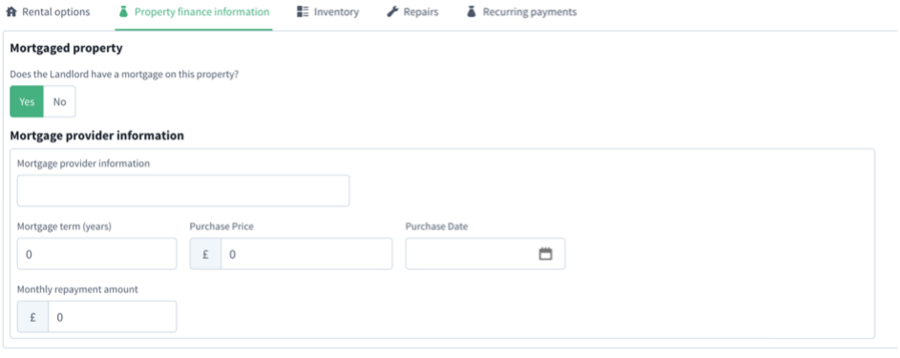
If you have the financial information regarding the property from the landlord, these figures can be stored here:
Mortgage provider information who the current mortgage is with
Mortgage terms the number of years on the mortgage
Purchase price what was paid for this property
Purchase date when the Landlord purchased the property
Monthly repayment amount how much the Landlord is repaying on this property
Utility providers
Standout allows you to store the current utility providers that service this property.
Inventory
If a property has items that within it that the Landlord has agreed that the tenant can use, this section will record those items
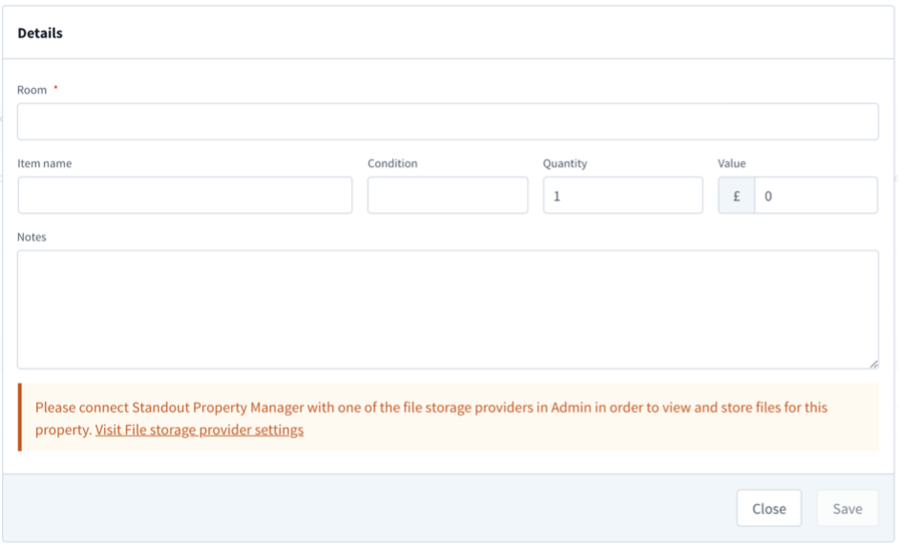
Please note: You must have a Dropbox or Google Drive account configured if you wish to upload files.
Room which room is the item in
Item Name name of the item
Condition what condition is it in
Quantity how many of these item(s)
Value value of the item(s)
Notes additional notes
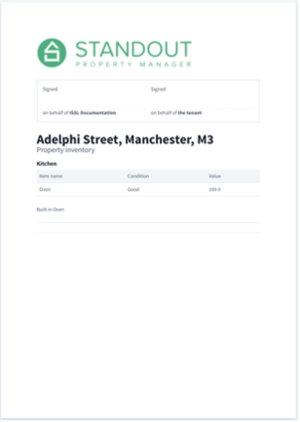
Example:
Inventory print
The report will be shown in a new tab in your browser, allowing you to print either onto paper or to a PDF document.
Repairs – recording, assigning and invoicing
When a tenant contacts your branch to report a repair in this tab you can record the repair, then you can allocate this repair to a contractor. Once a contractor has undertaken the repair, an invoice can then be raised.
Adding a repair
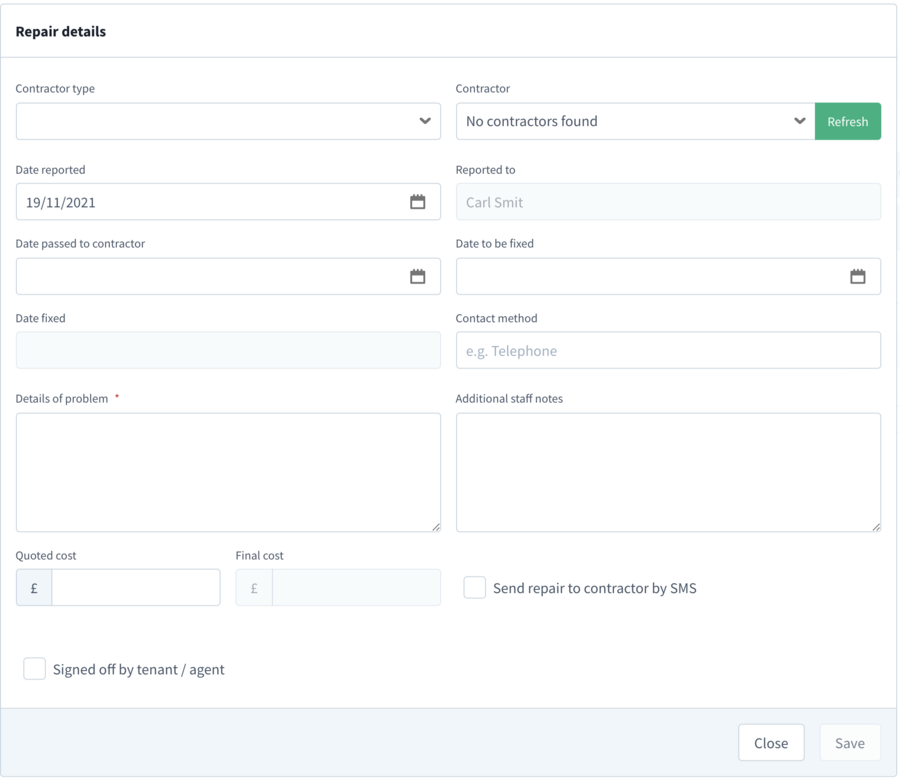
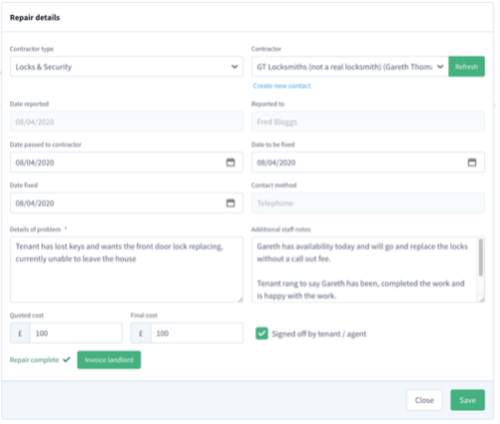
This form will allow you to record the repair whilst your tenant in on the phone or in branch:
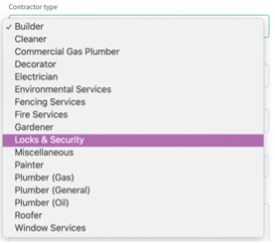
Contractor type a list of contractors for selection
Contractor a list of contractors you’ve created, if you haven’t got a contractor entered, you can enter one here
By clicking Create contact a new tab will open in your browser
Date reported the date tenant reports the issue(s)
Reported to the staff member logging the report
Date passed to contractor date the staff member passes to the contractor
Date to be fixed date quoted by the contractor
Date fixed date of the actual repair
Contact method how did the tenant contact you – phone/visit?
Description of problem full description of this repair/issue
Addition staff notes any internal staff note
Quoted cost quoted cost by the contractor
Fixed cost the actual cost (if different than the quote)
Send repair to contractor by SMS Send the details (either creating or editing) to a contractor by SMS (you MUST enter the contractors mobile address) AND have SMS credit
Signed off by tenant / agent work completed and accepted by tenant
Once this has been saved, you will need to re-edit this repair, to enter additional details, costs, change of contractor.
Updating the repair
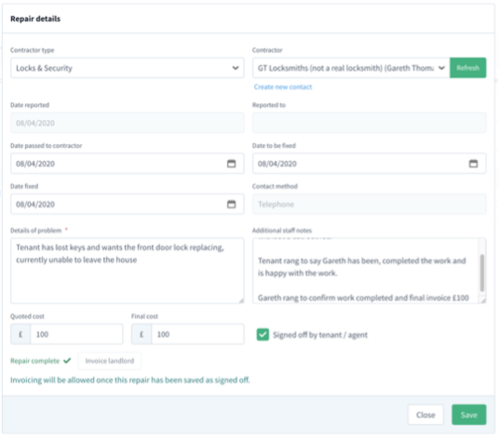
Having chosen (or even amended the contractor), update the repair with any further details such as quoted date, cost or additional information relevant to the repair.
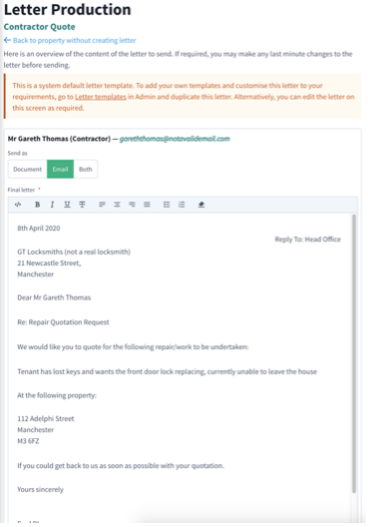
Send details to the contractor
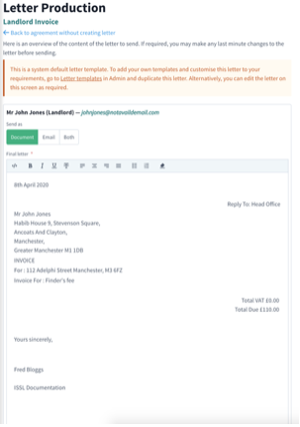
The above is the Master Letter but you can duplicate and amend this letter (Administration/Letter templates). By choosing Email, when you click the Go button, Standout will queue and send your letter by email to the contractor.
Once the repair has been completed, update the repair with the final details
Click on Save and then Save Property, both saves are required prior to raising an invoice to the Landlord.
Invoicing the Landlord
Simply click the Invoice landlord which will then raise an invoice, to view invoices, if you go to Rental Agreements and then Financials you will then be able to see the invoice in the transactions list
Print an invoice to the Landlord (or Tenant) – for this example we will choose the Finders Fee transaction
Click Actions then Print Invoice
Whilst you can select either, it best to use Landlord Invoice for Landlords and Tenant Invoice for Tenants.
Printing the invoice
You can either print the Letter, Email or both, choose your option then click Go. If you’ve configured a file storage provider, copies are stored in the Files tab in the property.
Recurring payments
These payments generate a payment request to the tenant, and are intended to be used for things like extra car parking space, gardening services, window cleaning etc, automatically applied to active agreements and can be seen in the Financials tab
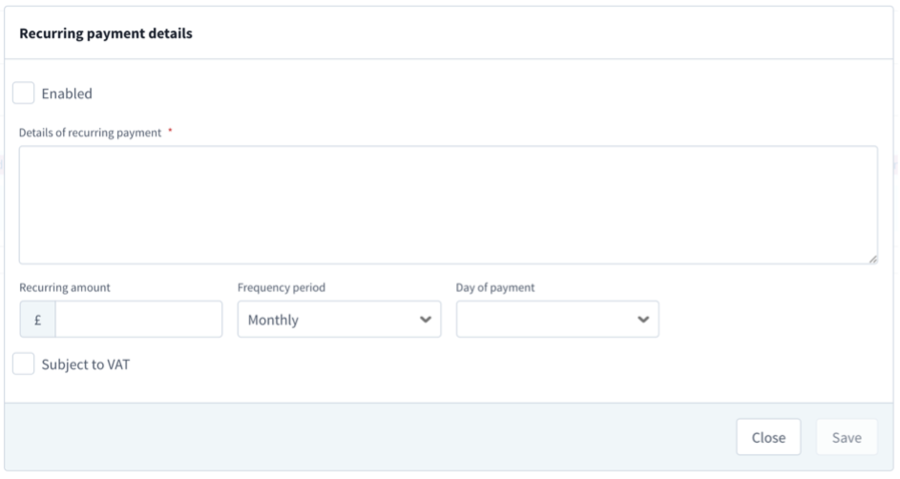
Creating a recurring payment
Enabled to save deleting payments, Enable or Disable as required
Details of recurring payment Details of the payment
Recurring amount How much is the payment required from the tenant
Frequency period How often do you need an invoice raising
Day of payment Which Day (Sunday-Saturay)
Subject to VAT Does the amount include VAT
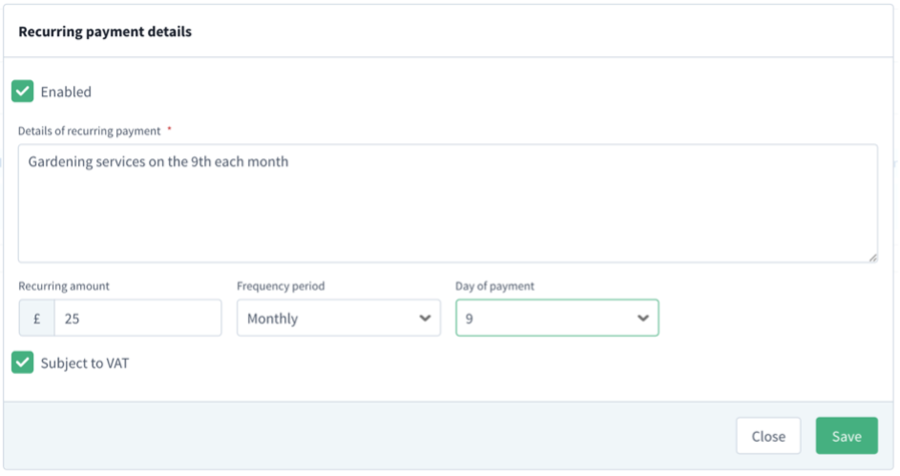
Recurring payment example
Recurring payment example in Financials
To print or email a copy of the invoice to the tenant, just click Actions then choose Print Invoice.
Service appointments
These appointments are an easy way to create a diary appointment when an appliance requires a service, such as a boiler, fire alarm, burglar alarm or anything else.
Creating a service appointment
If you have logged into Office 365 (click the Login to Office 365 button on your Dashboard), any service appointments created in Standout will automatically be added to your Outlook Calendar. Please note: do NOT edit an appointment in Outlook Calendar but in the Standout Diary.
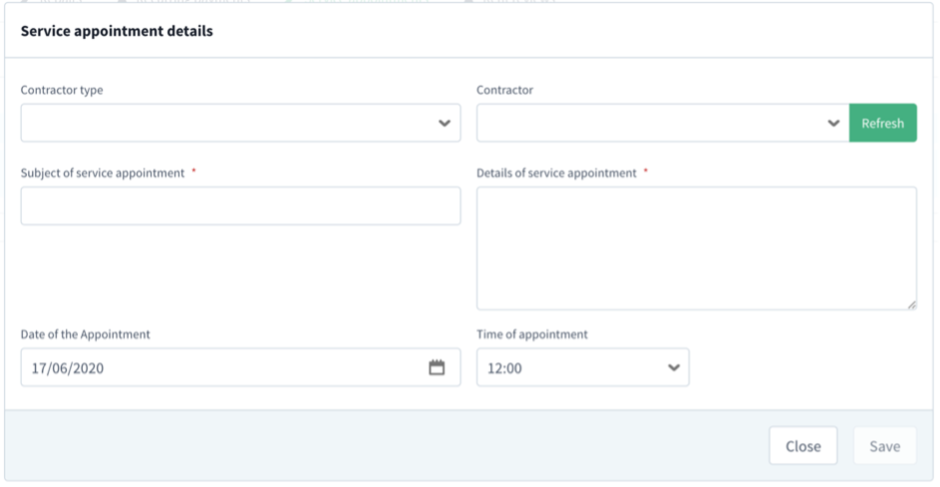
Contractor type a list of contractors for selection
Contractor a list of contractors you’ve created, if you haven’t got a contractor entered, you can enter one here
Subject of the service appointment This is the subject line of the email that will be sent
Details of service appointment Details of the service appointment
Date of the appointment When the contractor is required at the rental property
Time of appointment What time is the contractor expected at the rental property
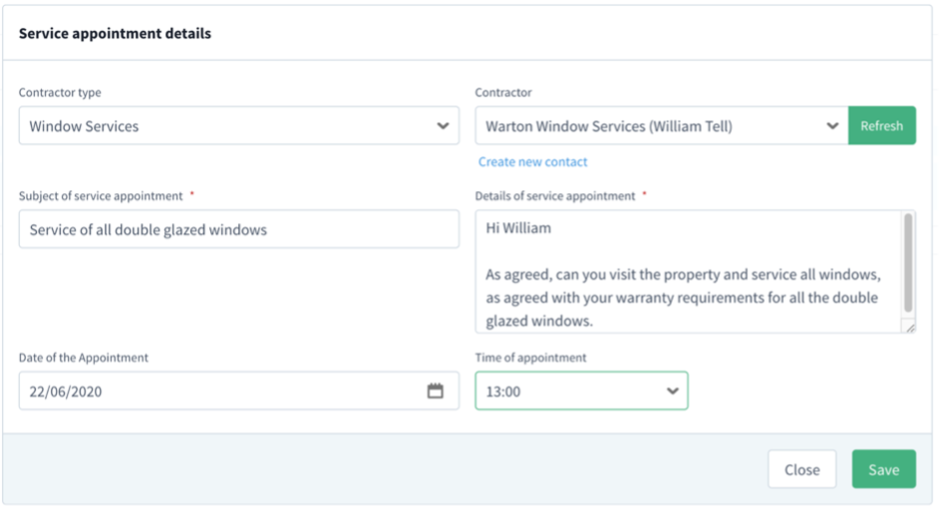
Service appointment example
Rent review appointments
These appointments are an easy way to create a diary appointment when arranging a rental price review with the current tenant.
Creating a rent review appointment
If you have logged into Office 365 (click the Login to Office 365 button on your Dashboard), any appointments created in Standout will automatically be added to your Outlook Calendar. Please note: do NOT edit an appointment in Outlook Calendar but in the Standout Diary.
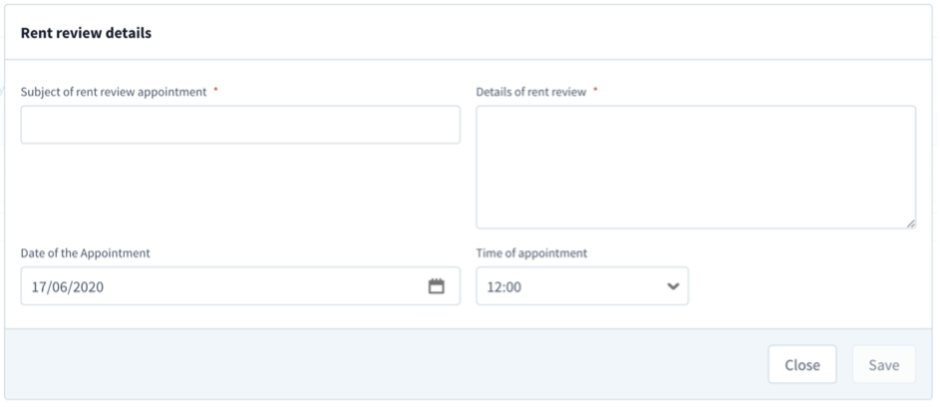
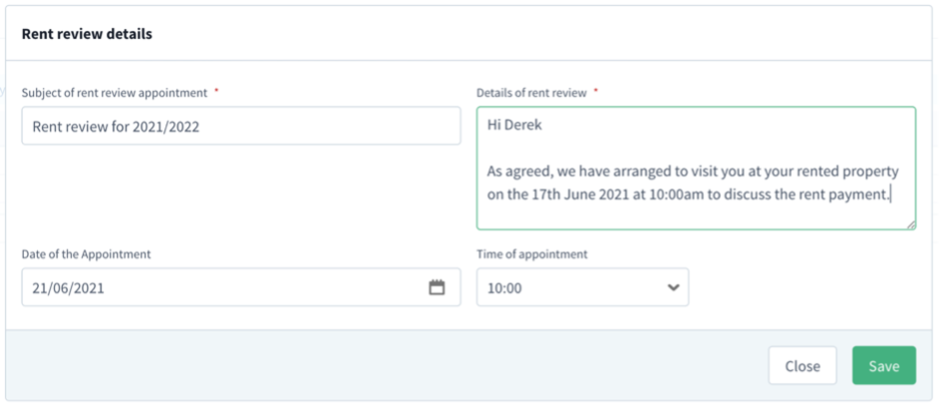
Subject of the appointment This is the subject line of the email that will be sent
Details of appointment Details of the rent review appointment
Date of the appointment When the contractor is required at the rental property
Time of appointment What time is the contractor expected at the rental property
Rent review appointment example
Occupants
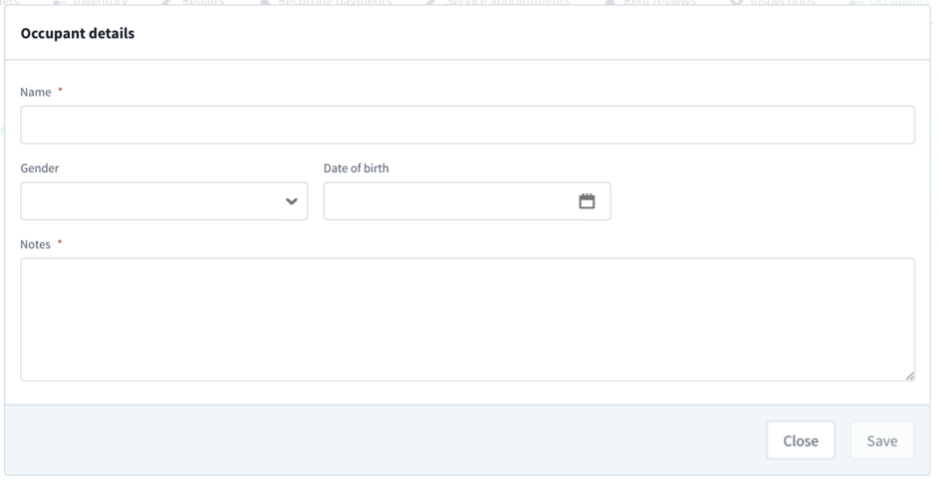
This section is to record those occupants under 18 years of age that may need to be recorded. An occupant can only be added to a property whilst there is a tenancy agreement in place
Adding an occupant
Enter their Name, Gender, Date of birth and any notes that need to be stored, clicking Save will either add a new occupant or update an existing one.
Rental Mode - Fully Managed
This document will assume that you’ve created a new property, linked it to a Landlord, placed it on the market and have now found a tenant for said property.
Throughout this process, Standout will offer to create Letters to send to all parties concerned. These will be stored against the property and will allow them to be printed and/or emailed. Side note – all Letters can be amended in Administration / Letters.
Once your potential client has visited the property (Book Viewing) and offers a rental figure, open the property and select the Viewing / offer tab.
You’ll see all the viewings and offers. Select your client, click Make offer (print/email appropriate letter) you will then see
Click the Accept offer and a warning will appear near the top/centre of your screen
You can print/email or both when producing letters, click Go to print your documents for each of the contacts (Standout creates docx documents).
Once complete, click the Back to Property button near the bottom of the screen.
The property is now at the status of “Under offer”
Once under offer and you’ve completed all the necessary credit checks, obtained the deposit from the tenant, you can then create the tenancy agreement.
Creating the tenancy agreement
SMS text messages can be sent to the tenant, this can be from one to seven days before the rent being due. This option is reliant on one of three configuration settings, a valid email and/or a valid mobile number on the tenant record and SMS credits will need to be purchased, for more information see the Administration Manual and/or the system in Administration / Branch / SMS.
Please see below where to configure these settings in an agreement.
Click More actions and then choose the Rental agreements option to continue
Agreements
If any older agreements exist, they will be listed on the left side of the screen and can be viewed. To create an agreement, all the required information will be on the right side of the screen:
Agreement Details
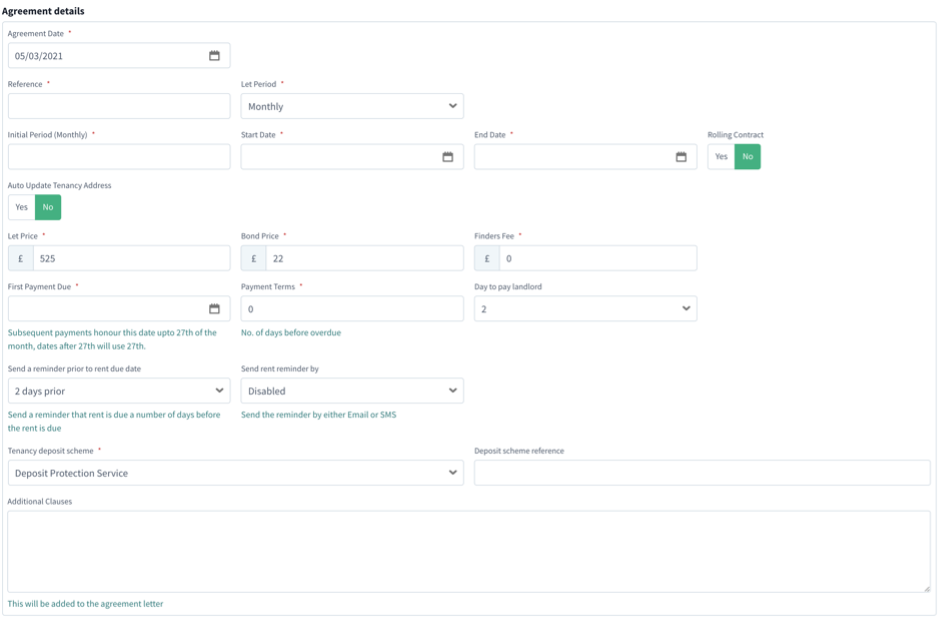
Within Agreement details, the following information needs to be input:
Agreement Date the date the agreement is created
Reference a unique reference for this tenancy agreement
Let period Weekly/Monthly/Quarterly/Annually/Per 4 Weeks/Per Person Per Week
Initial Period (Monthly) the amount of time (in months) the tenancy is for (eg: 6/12/18/24)
Start Date the date the Tenant moves into the property
End Date the date that the agreement ends
Rolling Contract if both Landlord and Tenant agrees to a rolling contract set this option to Yes, otherwise No for the contact to end
Auto Update Tenancy change the Tenants address automatically from the one
Address entered on the system, with the address of this property.
Let Price the price the Tenant will pay during the tenancy
Bond Price the price of the Bond that will be paid and transferred to your Deposit Holding Scheme
Finders Fee the amount you charge a Landlord for arranging a tenancy
First Payment Due the first date when payments are due
Payment Terms the number of days when a payment becomes overdue
Day to pay Landlord when you are due to pay the Landlord his part of a tenancy Payment
Send a rent reminder If you choose to send the tenant a rent reminder, you can
Choose between 0 (disabled) up to 7 days prior
Send rent reminder by How to send the reminder – Disabled / Email / SMS*
Tenancy deposit Scheme which scheme you have signed to
Deposit Scheme reference reference for this bond payment
Additional Clauses any addition clauses that may be outside of the written
tenancy agreement
Note – Rent reminder emails can be customised by go to Administration/Email templates and duplicate the master version for your own agent version.
* SMS messages will only be sent if there is sufficient credit on your account (to check this go to Administration / Branch / Branch Name then the SMS tab
Initial Inspection Visit
If you have visited the property prior to this can be recorded here.
Guarantor
If you require a tenant to provide a guarantor, once you’ve added their details into the system, you can start typing their first name will appear in this area to link to this agreement.
Fee details
This is the amount you take from the rental amount to pay for your services. This can be a fixed amount or a Percentage. Fees will be applied on either the due date of the tenants payment or when the tenant actually pays that periods rent.
Staff details
Select a member of Staff to enter all diary appointment and reminders to. This does not have to be the member of staff creating the agreement.
Meter readings
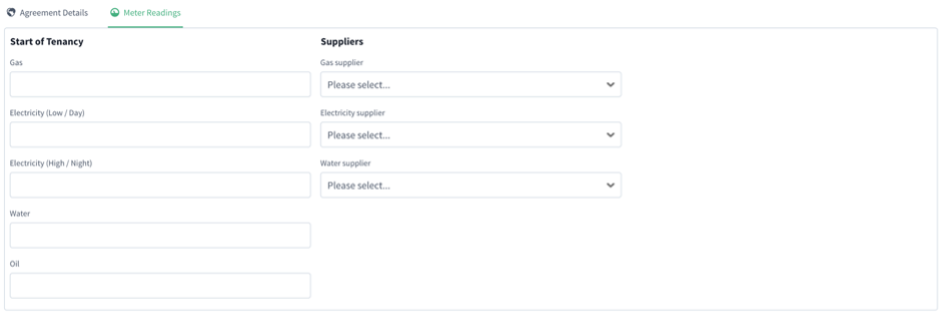
Start of Tenancy
Compete all those know fields prior to the tenant moving in, if you have that information to hand.
During Tenancy
Throughout the tenancy you can add meter readings, click the Record readings button. Then choose the date the meter readings were provided by your tenant. You must enter at least 1 meter reading for the information to be recorded. They can be either Gas, Electricity, Water or Oil. Once you have entered at least one set of meter readings, all readings will be displayed in a table. Should you enter the wrong information, you can delete those details by clicking and confirming your deletion request.
Once all the information has been completed, click Create agreement
Creating the Tenancy Agreement
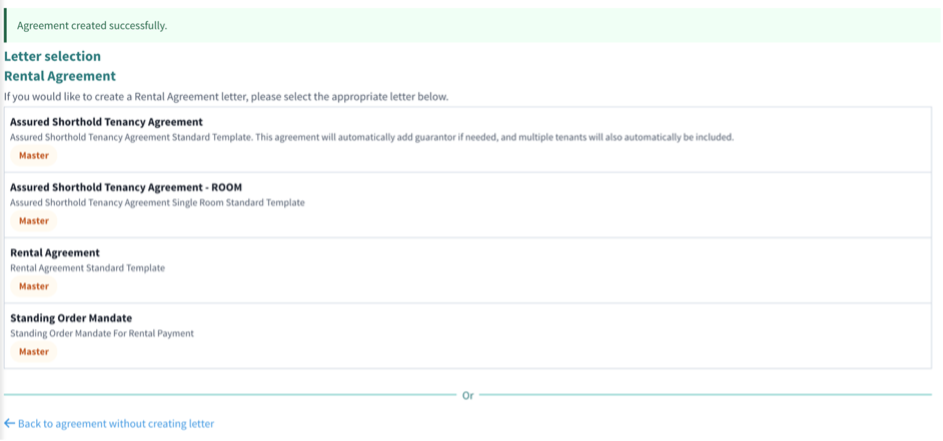
Upon successful creation of a tenancy agreement the system will take you to the Letter section. There will be a selection of pre-defined and user-defined letters available. Prior to using the system, we recommend that you create agency specific documents, especially tenancy agreements.
The default (Master) documents are:
Assured Shorthold Tenancy Agreement
Assured Shorthold Tenancy Agreement – ROOM
Rental Agreement
Standing Order Mandate
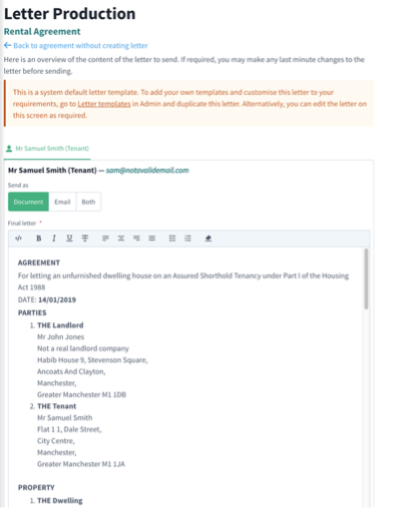
Rental Agreement (Master – example)
Click Go to create the documents (they will download to your computer)
Click the Back to Property button and all the created documents will be placed in the Files linked to this property.
Financials
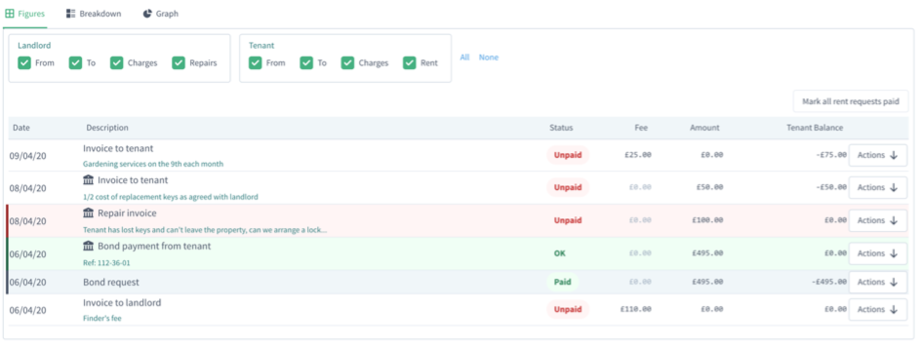
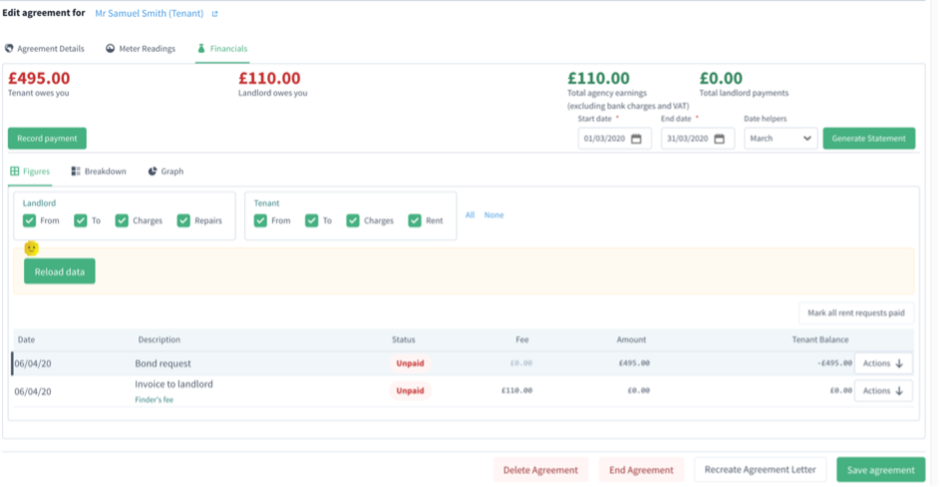
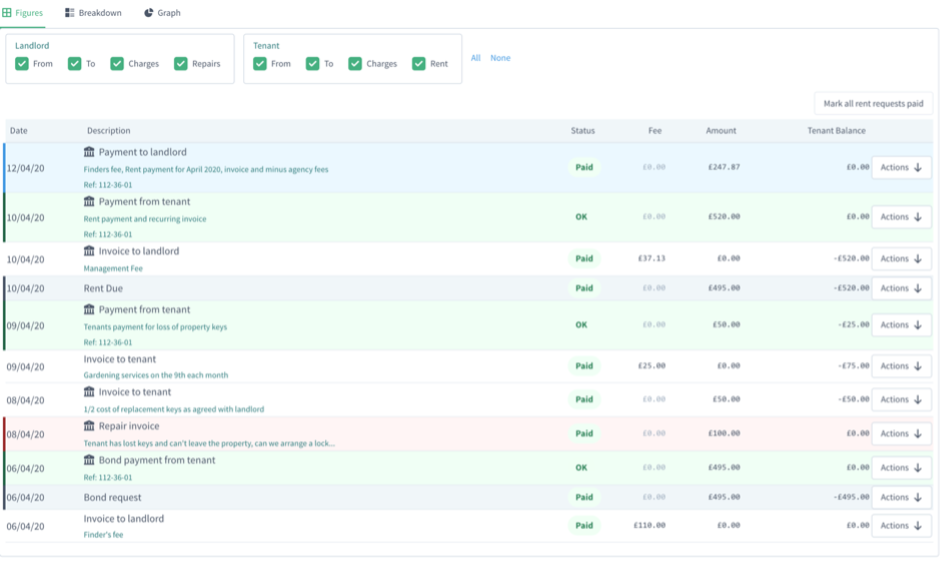
You will see two transactions, an invoice to the Landlord for the Finders Fee and a Bond request for the Tenant pay.
Bond payment
The first payment to be registered on the system, is the Tenants payment of their Bond
Direction From a Tenant/Landlord
To a Tenant/Landlord
Party Landlord/Tenant/Other for tenant
Payment Method Cash / Bacs / Cheque / Card
Payment Type Rent / Other / Bond
Amount Amount being paid
Date Date of the transaction
Reference Reference of the payment (free form text)
Description a free form description of the transaction
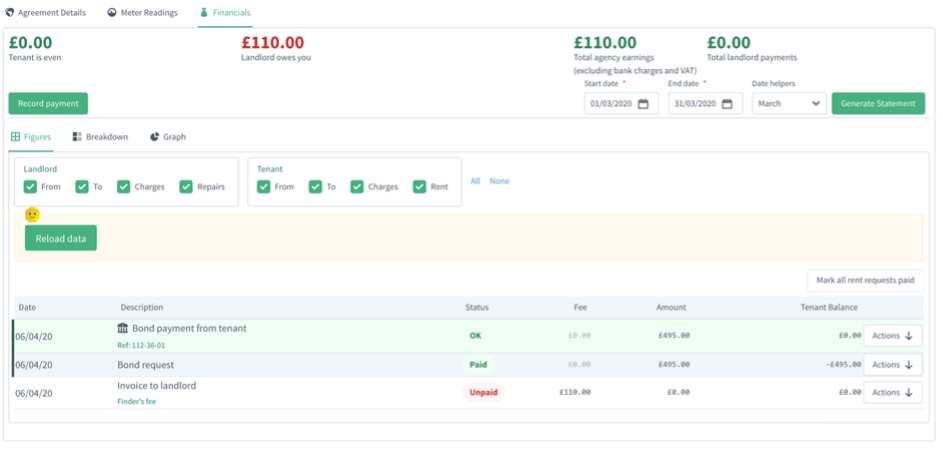
You will see that the system has automatically assigned the Bond payment to the Bond request and is marked as Paid.
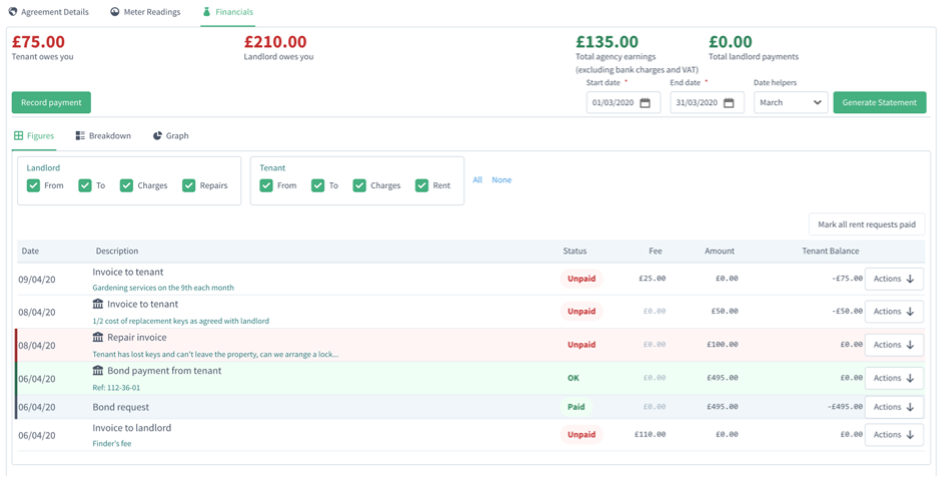
The current status of our tenanted property now shows the Financials as
We explained earlier in this document how to create an invoice (and a recurring invoice) to the tenant and the landlord, they now show as unpaid. In our scenario (which will probably never occur – but, so that we can show transactions in this document) is that the tenant received keys, started to move in and then subsequently lost them, the Landlord agreed in good faith to pay half so we have raised an invoice to the Landlord for £100 for the contractors fee and then an invoice to the tenant for £50 as they split the bill.
Tenant Rent payment
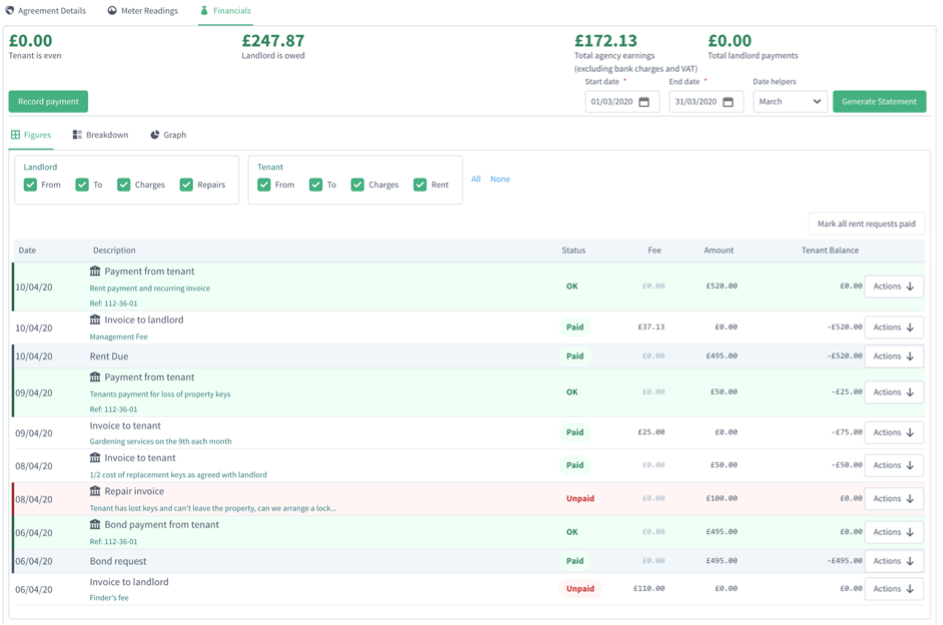
We will record a payment of the Tenants first month’s rent on the 10/04/20 within the Bulk Payment section – for how to do this and see how to use Bulk Payments, please see the Bulk Payments Document. We also paid the outstanding tenant invoice for the locksmith.
Our tenant does not owe any monies as all payments, rent due and invoices have now been completed.
Landlord payment
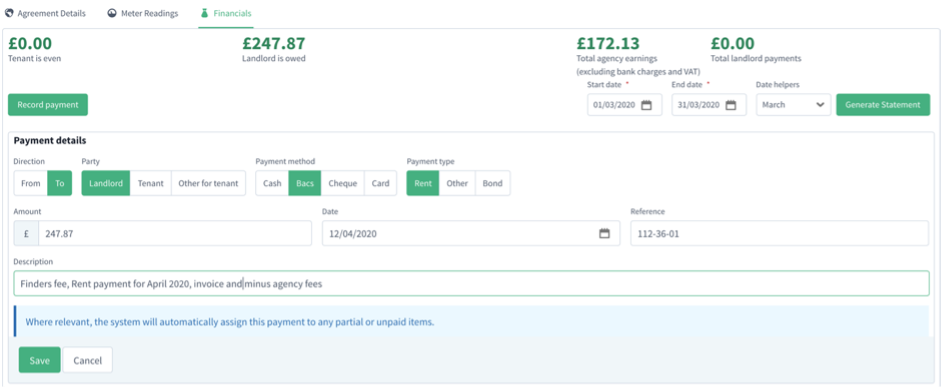
Depending on how you have configured the agreement, the payment to the Landlord will either be due now, or after a number of days (we configured it for 2 days from receiving payment). In our example, the Landlord is now due a payment of £247.87.
Financials statement
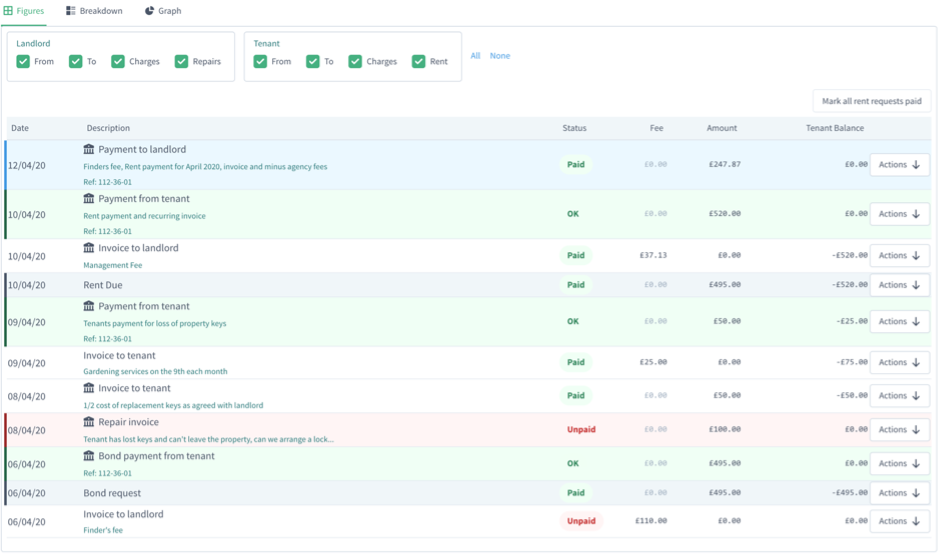
The financials statement shows that all parties are even (no payments due) but, two invoices show that they have not been paid. As this is incorrect, simply choose Actions and click “Mark paid” to both of them
Now all figures and financial lines are correct.
Landlord statement
Should a Landlord with to obtain a statement from you, all you need to do, is choose from the following
Select the chosen Date range and click Generate statement
You can then either Download Statement or Email PDF to contact depending on your requirements.
Emailing all tenants
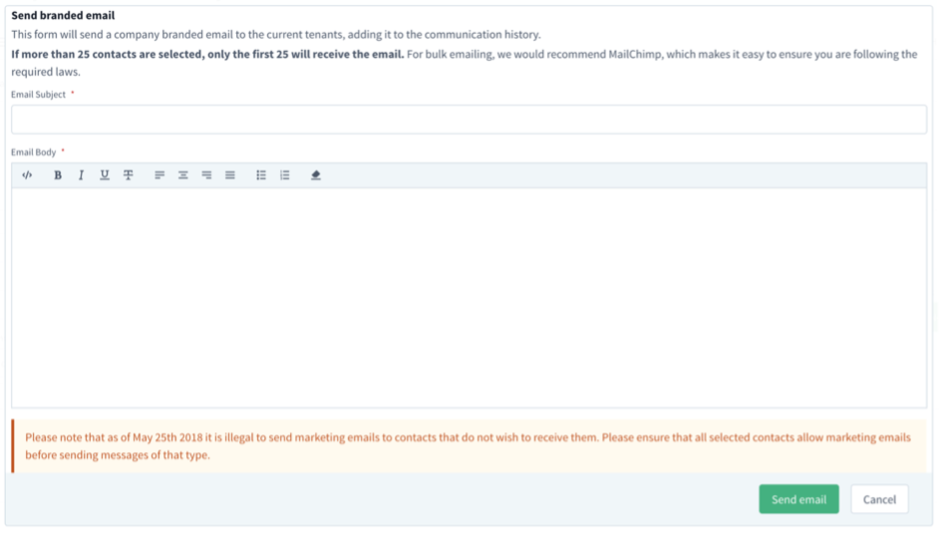
When editing a Shared property (HMO), you can now email all the tenants with a current agreement. Simply click More actions and then Email all tenants button
Simply add a subject and email body, click Send email and all tenants that have supplied an email address will receive the email. This could be used when tenants need to be informed of communal area repairs or disruptions.
Rent Reminder Email Template
To amend the template, go to Administration / Email Templates tab
When customising your own email, ensure that you click the “Duplicate” button before editing, once you’ve completed your changes, click “Save email”.
You can change the wording of this email, but you must ensure that you keep the field names within {} the same, otherwise, the system will not replace them correctly for your tenant details.


